Homemade Peanut Butter: Cheaper, Cleaner, and Just 2 Ingredients
Peanut butter holds a cherished spot in pantries worldwide, a creamy, nutty delight enjoyed on toast, in sandwiches, or straight from the spoon. However, a quick glance at the ingredient list on many store-bought jars often reveals a surprising array of additives: hydrogenated oils, added sugars, emulsifiers, and preservatives. These extra components not only dilute the natural goodness of peanuts but can also impact your health and budget. What if we told you there’s a way to enjoy incredibly fresh, delicious peanut butter that's not only significantly cheaper but also made with a pristine ingredient list of just two items? Welcome to the world of homemade two ingredient peanut butter, where simplicity meets superior flavor and purity.
This comprehensive guide will walk you through the effortless process of creating your own peanut butter, proving that the best things often come with the fewest components. You’ll discover why crafting your own spread is a game-changer for your wallet, your health, and your taste buds, all while mastering the art of making the best, super smooth, and creamy peanut butter with nothing more than raw peanuts and a touch of salt.
Why Go Homemade? Unpacking the Benefits of Homemade Two-Ingredient Peanut Butter
Choosing to make your own peanut butter isn't just a fun kitchen experiment; it's a conscious decision that offers a multitude of benefits, placing control back in your hands. From cost savings to ingredient transparency, the advantages are clear and compelling.
Cost Savings: A Wallet-Friendly Choice
One of the most immediate benefits you'll notice when embarking on your homemade two ingredient peanut butter journey is the significant cost saving. While a jar of high-quality, natural peanut butter can be quite expensive, the primary ingredient — raw peanuts — is surprisingly affordable, especially when purchased in bulk. By processing them yourself, you're essentially cutting out the manufacturing, packaging, and marketing overheads that drive up the price of commercial products. Over time, these savings add up, making homemade peanut butter a smart economic choice for regular consumers. You also control the quantity you make, reducing waste and ensuring you always have fresh butter on hand without overspending on large jars that might sit for too long.
Clean Label: Know What You're Eating
This is perhaps the most compelling reason to make your own. Store-bought peanut butter often comes laden with unnecessary ingredients. Many popular brands include added sugars for sweetness, hydrogenated oils (like palm oil or soybean oil) to prevent separation and improve texture, and various emulsifiers or stabilizers to maintain consistency. These additions can undermine the nutritional value of what should be a simple, healthy food. With homemade two ingredient peanut butter, your ingredient list is transparent: just roasted peanuts and a pinch of salt. This simplicity makes it an excellent choice for those managing dietary restrictions, looking for gluten-free options, or simply aiming to reduce processed foods in their diet. When you make it yourself, you have absolute certainty about what goes into your body, promoting better health and peace of mind. To delve deeper into the advantages, explore
Why Make 2-Ingredient Peanut Butter? Better Than Store-Bought!
Unbeatable Freshness and Flavor
Imagine the rich, deep aroma of freshly roasted nuts, a fragrance that store-bought varieties simply can't replicate. When you make peanut butter at home, you capture this essence at its peak. The flavor profile is brighter, more intense, and distinctly nutty, free from the dullness that can accompany shelf-stable processed spreads. You also have the power to customize the taste to your preference, from the level of roast to the precise amount of salt. This freshness isn't just about taste; it also means you're consuming nutrients at their optimal state, enjoying a truly vibrant and wholesome spread.
The Star Ingredients: What to Look for in Peanuts
The quality of your homemade two ingredient peanut butter hinges almost entirely on the quality and type of peanuts you use. Making the right choice at the grocery store or market is crucial.
Raw vs. Roasted: The Crucial First Step
For the best homemade peanut butter, it’s imperative to start with **raw, unroasted peanuts**. This might seem counterintuitive, as you'd think pre-roasted nuts would save a step. However, store-bought roasted peanuts frequently contain additives such as oils, extra salt, flour/starch, and sometimes even spices or herbs, which you want to avoid for a pure two-ingredient spread. The most critical reason, though, is that *you* need to roast the raw nuts at home. This process is essential because it coaxes out their natural oils, which are vital for achieving that wonderfully creamy texture during blending. Skipping this step by using already roasted peanuts that haven't been freshly heated will result in a drier, less cohesive butter. Learn more about this vital step in
Mastering 2-Ingredient PB: Roasting Peanuts for Perfect Creaminess.
Blanched vs. Unblanched: Simplifying the Process
When purchasing raw peanuts, you'll often find them available as either blanched (skins removed) or unblanched (skins intact).
* **Blanched peanuts** are a fantastic option if you're looking to save time and reduce mess. The skins have already been removed, eliminating a step in the preparation process.
* **Unblanched peanuts** require you to remove the skins yourself after roasting. While this adds a small amount of time, it's not overly difficult. Once roasted and slightly cooled, you can easily remove the skins by rubbing the nuts vigorously between your hands or in a clean kitchen towel. A few stubborn skins might remain, which is perfectly fine and won't affect the taste or texture significantly. Some people even prefer to leave a little skin on for added fiber and a slightly more rustic feel.
Choosing Your Peanut Variety
There are four main varieties of peanuts commonly available: Valencia, Runner, Virginia, and Spanish. While any can be used for homemade peanut butter, **Runner peanuts** are traditionally the preferred choice for their uniform size and excellent roasting characteristics, which contribute to a smooth, consistent butter. However, don't hesitate to experiment with what's available to you or what you prefer. Virginia peanuts are larger and often used for snacking, while Spanish peanuts are known for their reddish skins and higher oil content, potentially yielding an extra creamy result.
Your Easy Guide to Homemade Two-Ingredient Peanut Butter
Making homemade two ingredient peanut butter is surprisingly straightforward, requiring minimal equipment and just a few simple steps.
Step 1: Roasting for Richness
This is the most crucial preliminary step, activating the nuts' natural oils and enhancing their flavor.
- Preheat your oven to **325ºF (165ºC)**.
- Spread your raw peanuts in a single layer on a baking tray.
- Roast for **7-10 minutes**. Keep a close eye on them; peanuts can burn quickly. You're looking for a light golden color and a fragrant aroma.
- Once roasted, remove from the oven and allow them to cool completely. This cooling period is essential as it helps the oils to settle and makes the skins easier to remove.
*Note: Even if you're using peeled raw peanuts, they still need to be roasted.*
Step 2: Peeling (Optional, but Recommended)
This step is optional if you bought already blanched peanuts or prefer a more rustic, skin-on butter. However, for a super smooth consistency, peeling is recommended.
- Once the roasted peanuts are cool enough to handle, transfer them to a clean kitchen towel.
- Gather the corners of the towel to form a pouch, then vigorously rub and scrunch the peanuts together. The skins should loosen and fall off easily.
- Sift through the peanuts to separate the peeled nuts from the loose skins. Don't worry if a few skins remain; it won't impact the final product.
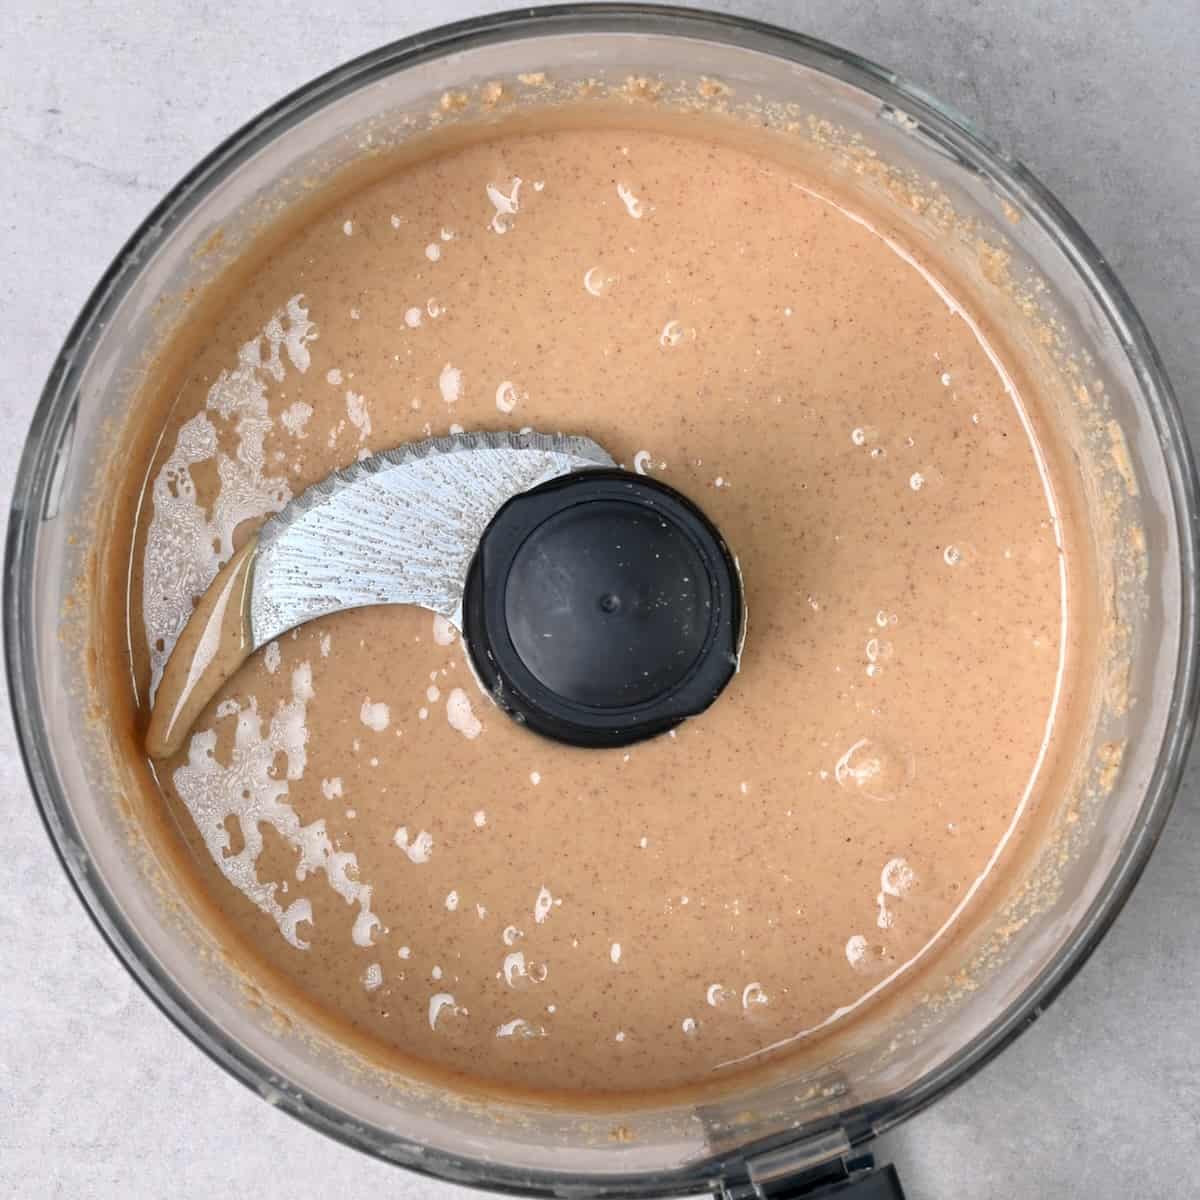
Step 3: Blending to Perfection
This is where the magic happens, transforming simple roasted nuts into creamy, delicious peanut butter.
- Place the cooled, peeled peanuts into a **food processor** or a **high-speed blender**.
- Add a **generous pinch of salt** (about ¼ to ½ teaspoon per 2 cups of peanuts, adjust to taste).
- Begin to blitz the peanuts. The process will go through several stages:
- **Initial stage (1-2 minutes):** The peanuts will break down into coarse crumbs.
- **Second stage (2-4 minutes):** The crumbs will start to clump together and form a drier, thicker paste.
- **Third stage (4-7 minutes):** The paste will become smoother, and you'll start to see a sheen as the natural oils begin to release. It will eventually thin out and become creamy and pourable.
- Throughout the blending process, make sure to **scrape down the sides of the processor bowl** frequently with a spatula. This ensures all the nuts are evenly processed and prevents the machine from overheating.
- Continue blending until you reach your desired consistency. For chunky peanut butter, remove a portion of the coarsely chopped nuts after the initial stage and stir them back in at the end. For super smooth and creamy butter, keep blending until it's perfectly silky.
Depending on your machine and the quantity of peanuts, this process can take anywhere from 5 to 15 minutes. Be patient, and trust the process – the oils *will* release!
Tips for the Best Homemade Peanut Butter Experience
Elevate your homemade two ingredient peanut butter with these additional insights and tricks:
- Experiment with Salt: Salt is the second essential ingredient, and its quantity is entirely up to your preference. Start with a small pinch and add more gradually, tasting as you go. Fine sea salt or pink Himalayan salt can add an extra layer of flavor complexity.
- Storage Savvy: Store your homemade peanut butter in an airtight container at room temperature for up to 2-3 weeks. For longer storage, it can be kept in the refrigerator for up to a month or even frozen for several months. Remember that natural oil separation will occur, so simply stir well before each use.
- Flavor Variations (Beyond the 2-Ingredient Core): While the essence of this recipe is its two-ingredient purity, once you've mastered the basic technique, you might explore adding other natural flavors. A drizzle of honey or maple syrup, a pinch of cinnamon, or a dash of vanilla extract can create delightful variations. However, remember these additions would take it beyond the strict two-ingredient definition.
- Troubleshooting for Success: If your peanut butter isn't getting creamy, it's almost always a matter of patience and machine power. Ensure you're blending long enough, scraping the sides, and giving your food processor occasional breaks to prevent overheating. A larger batch of peanuts often blends more easily as there's more volume to create friction and release oils effectively.
- Beyond the Bread: Homemade peanut butter is incredibly versatile. Beyond classic sandwiches, use it in smoothies for a protein boost, as a base for savory sauces (think satay!), or even as an ingredient in homemade granola bars or delightful two-ingredient cookies, like the classic criss-cross variety that often just requires peanut butter and powdered sugar.
In conclusion, making your own homemade two ingredient peanut butter is a profoundly rewarding experience. It's a journey back to basics, offering a product that is not only significantly cheaper than its store-bought counterparts but also boasts an unparalleled freshness and a clean ingredient list you can trust. By choosing just raw peanuts and a hint of salt, you unlock a world of rich, pure flavor and take control of what nourishes your body. So, gather your peanuts, fire up your food processor, and prepare to be amazed by the simple magic of homemade two ingredient peanut butter – a staple that proves sometimes, less truly is more.